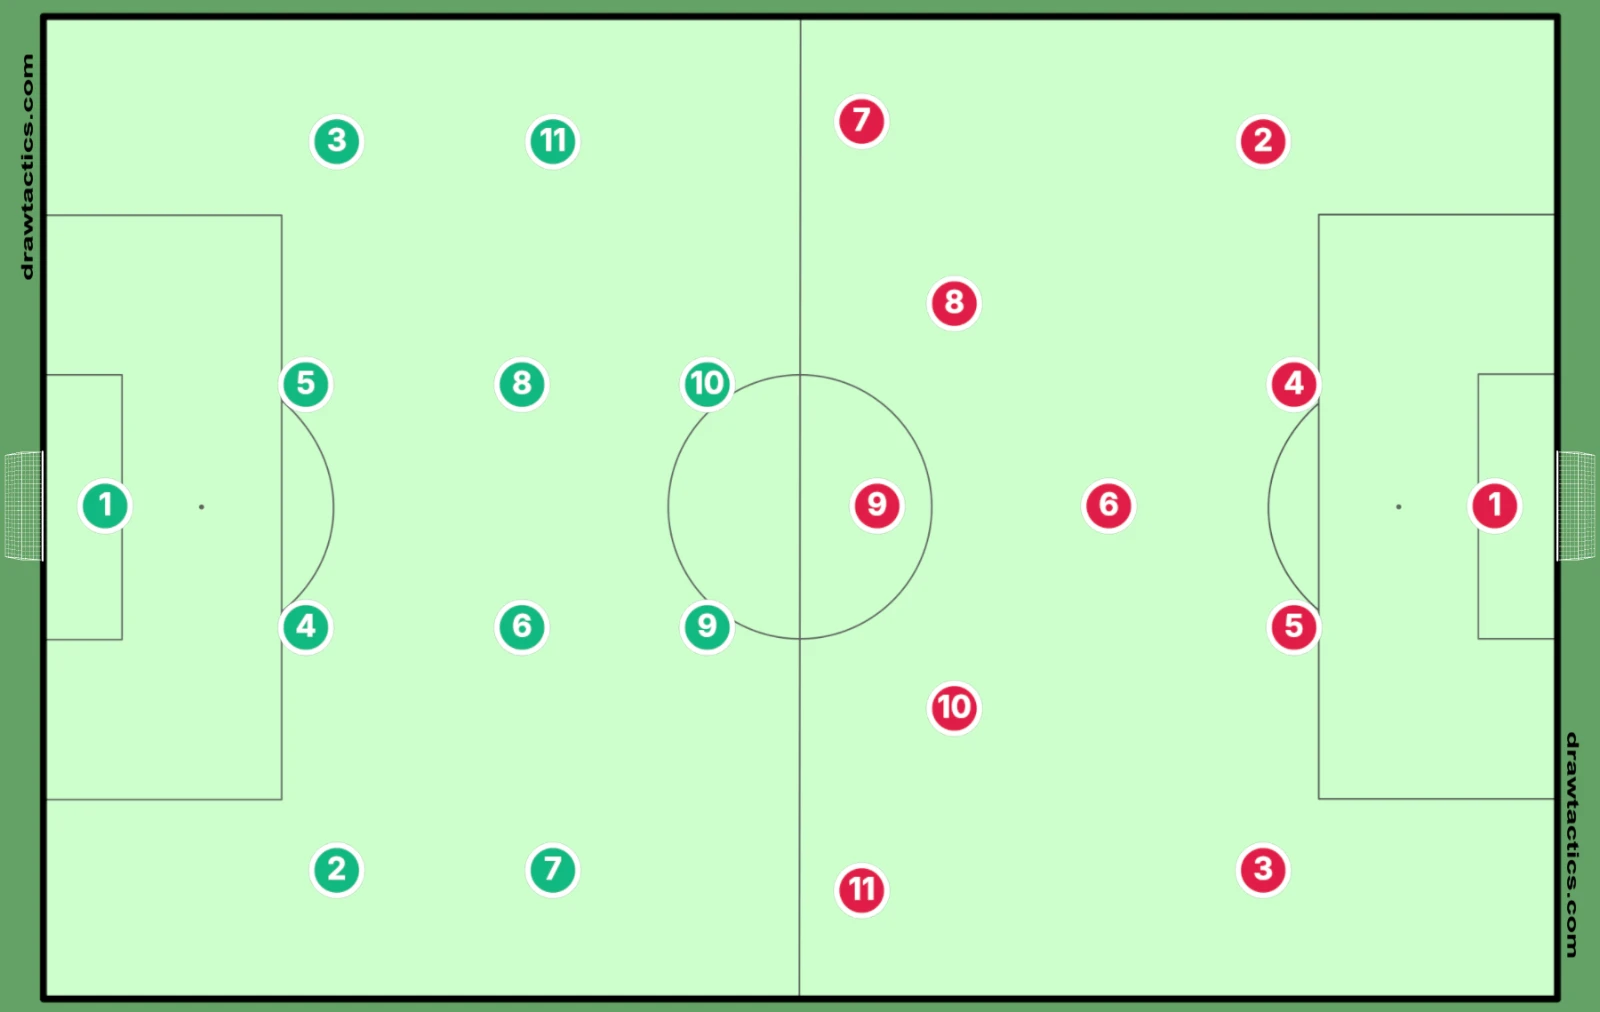
Which soccer formations are there, what does each one actually do, and which one fits your team? This guide puts the main 11v11 formations side by side, with a diagram of each: the 4-4-2, 4-3-3, 4-2-3-1, 3-5-2, 3-4-3, 4-1-4-1, 5-3-2 and the 4-4-2 diamond. For every shape you get its strengths, its weak spots and the kind of team it suits.
Along the way it covers how to read formation numbers, what the position abbreviations mean, how to choose a formation, and why every team really plays two shapes, one with the ball and one without. Each major formation also links to a full tactical guide if you want to go deeper.
In Short: Key Takeaways
- Formation numbers list the ten outfield players from back to front; the goalkeeper is never counted.
- There is no best formation. The right one depends on your players, your training time and your opponent.
- Teams change shape between attacking and defending, so the number on the team sheet is only a starting point.
- If you're unsure where to start, the 4-4-2 and 4-2-3-1 give every player the clearest job.
Full tactical guides by formation
- 4-4-2 Formation: Complete Tactical Guide: the compact block, the strike partnership and how to press.
- 4-3-3 Formation: Complete Tactical Guide: the midfield triangle, wingers and rest defense.
- 4-2-3-1 Formation: Complete Tactical Guide: the double pivot, the No. 10 and the 4-4-1-1 block.
- 3-5-2 Formation: Complete Tactical Guide: three center-backs, wing-backs and two strikers.
Table of Contents
- What Is a Soccer Formation?
- How to Read Formation Numbers
- Soccer Positions and Abbreviations
- 4-4-2
- 4-3-3
- 4-2-3-1
- 3-5-2
- 3-4-3
- 4-1-4-1
- 5-3-2 and 5-4-1
- 4-4-2 Diamond
- Formations Compared
- How to Choose a Formation
- What Is the Best Soccer Formation?
- Formations Change With and Without the Ball
- Formations for Small-Sided Soccer
- FAQ
What Is a Soccer Formation?
A formation is the basic shape a team lines up in: where each player starts, which area they're responsible for, and who they work with. It gives eleven players a shared picture of the team, which is why coaches usually start there before anything else.
A formation isn't a game plan on its own, though. Two teams can both play a 4-4-2 and look nothing alike: one presses high and attacks quickly, the other sits deep and waits to counter. The shape is the same; the distances between players and the rules they follow are what make the difference.
How to Read Formation Numbers
Formation numbers count the ten outfield players line by line, starting with the defense nearest your own goal. A 4-4-2 means four defenders, four midfielders and two forwards. The numbers always add up to ten, because the goalkeeper isn't included.
When a formation has four numbers, such as the 4-2-3-1 or 4-1-4-1, the midfield has been split into two layers. In a 4-2-3-1 there are two holding midfielders in front of the back four, three attacking players ahead of them, and one striker. More numbers simply describe the team's height and spacing in more detail.
Soccer Positions and Abbreviations
Formation diagrams, lineup cards and tactics boards almost always use short position names. Here are the ones used in the diagrams on this page. For what each position does, the skills it needs and the traditional numbers, see soccer positions explained.
| Abbreviation | Position | Main job |
|---|---|---|
| GK | Goalkeeper | Stops shots and, in the modern game, starts the build-up |
| CB | Center-back | Defends the middle, wins headers and organizes the back line |
| RB / LB | Right-back / left-back | Defends the flank in a back four and overlaps to attack |
| RWB / LWB | Right / left wing-back | Covers the whole flank on their own in a back three or five |
| DM | Defensive midfielder | Screens the defense and links the back line to midfield |
| CM | Central midfielder | Connects defense and attack, carries the ball and arrives in the box |
| RM / LM | Right / left midfielder | Holds the flank in a midfield four, helps defend and attack |
| CAM | Attacking midfielder (No. 10) | Plays behind the striker, creates chances and shoots |
| RW / LW | Right / left winger | Beats defenders one on one, crosses or cuts inside to shoot |
| RF / LF | Right / left forward | Plays just behind or beside the striker in a front three |
| ST | Striker | Scores goals, holds the ball up and leads the press |
4-4-2
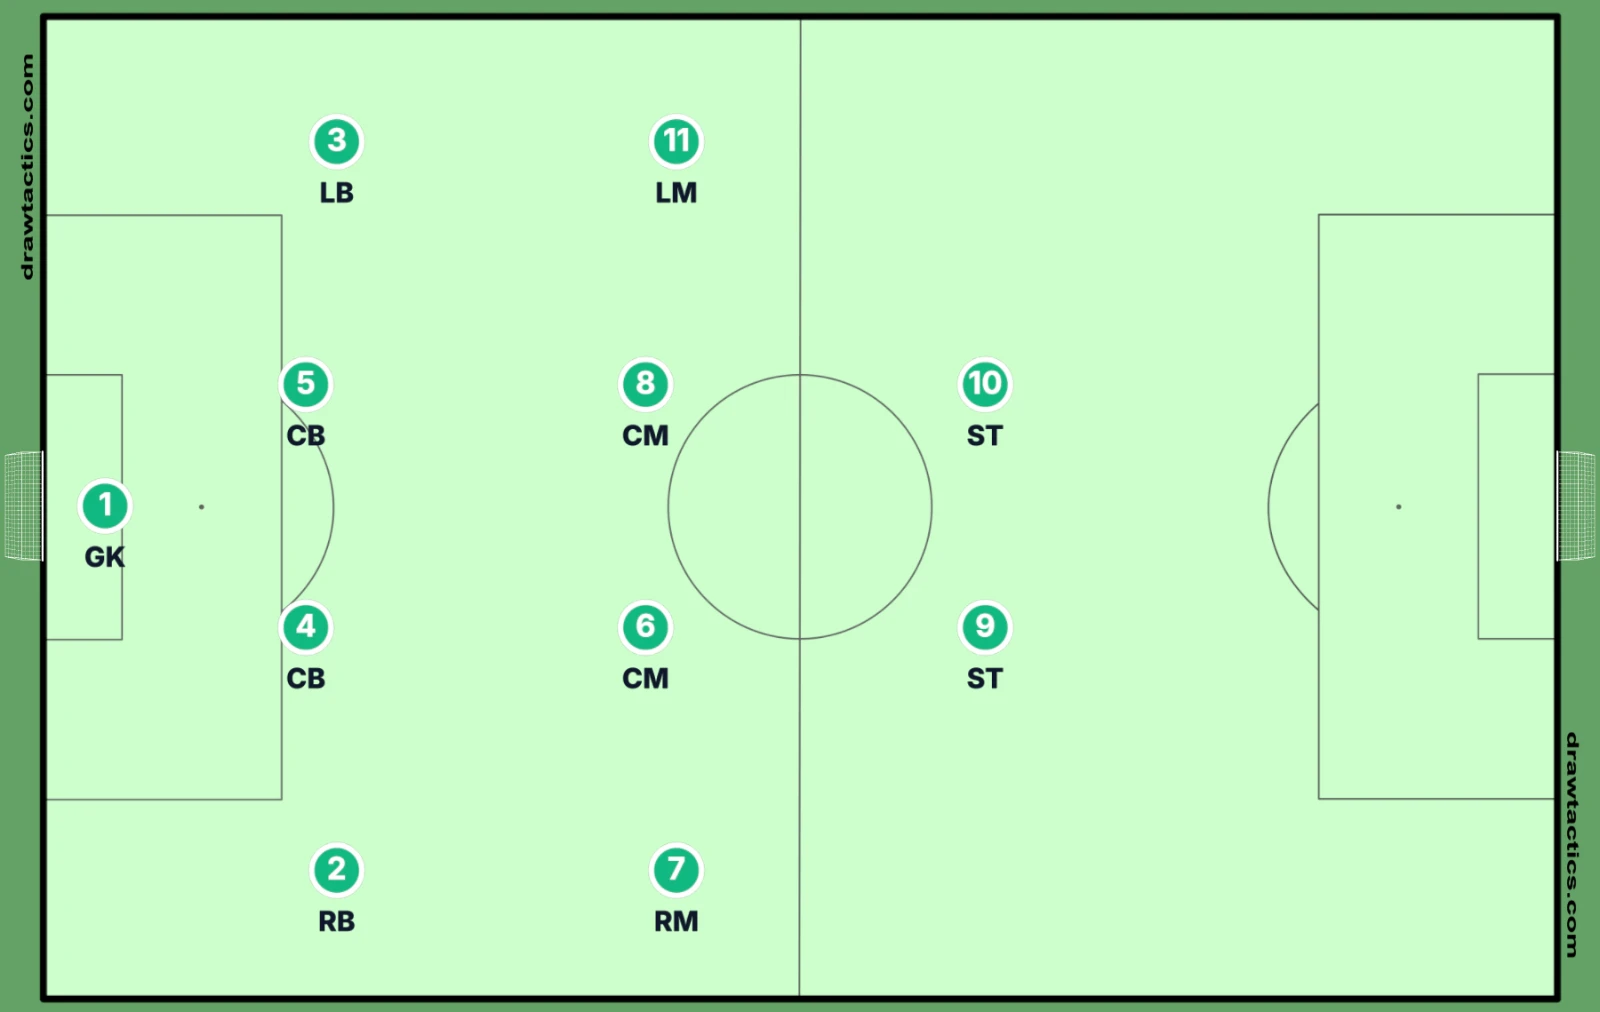
Two flat lines of four with a pair of strikers ahead of them: the 4-4-2 is the simplest balanced shape in soccer. Every player has a clear zone, and the two banks of four can slide across the field together without leaving holes.
Strengths: easy to organize with limited training time. The two strikers can press both center-backs, and they give you a ready-made partnership on the counter.
Weaknesses: only two central midfielders, so a three-player midfield can outnumber you. Opponents who find space between your lines can hurt you.
Best for: teams that want to defend well first, and youth teams learning positional basics. Arrigo Sacchi's AC Milan and Diego Simeone's Atlético Madrid showed how hard a compact 4-4-2 is to break down. Read the full 4-4-2 tactical guide.
4-3-3
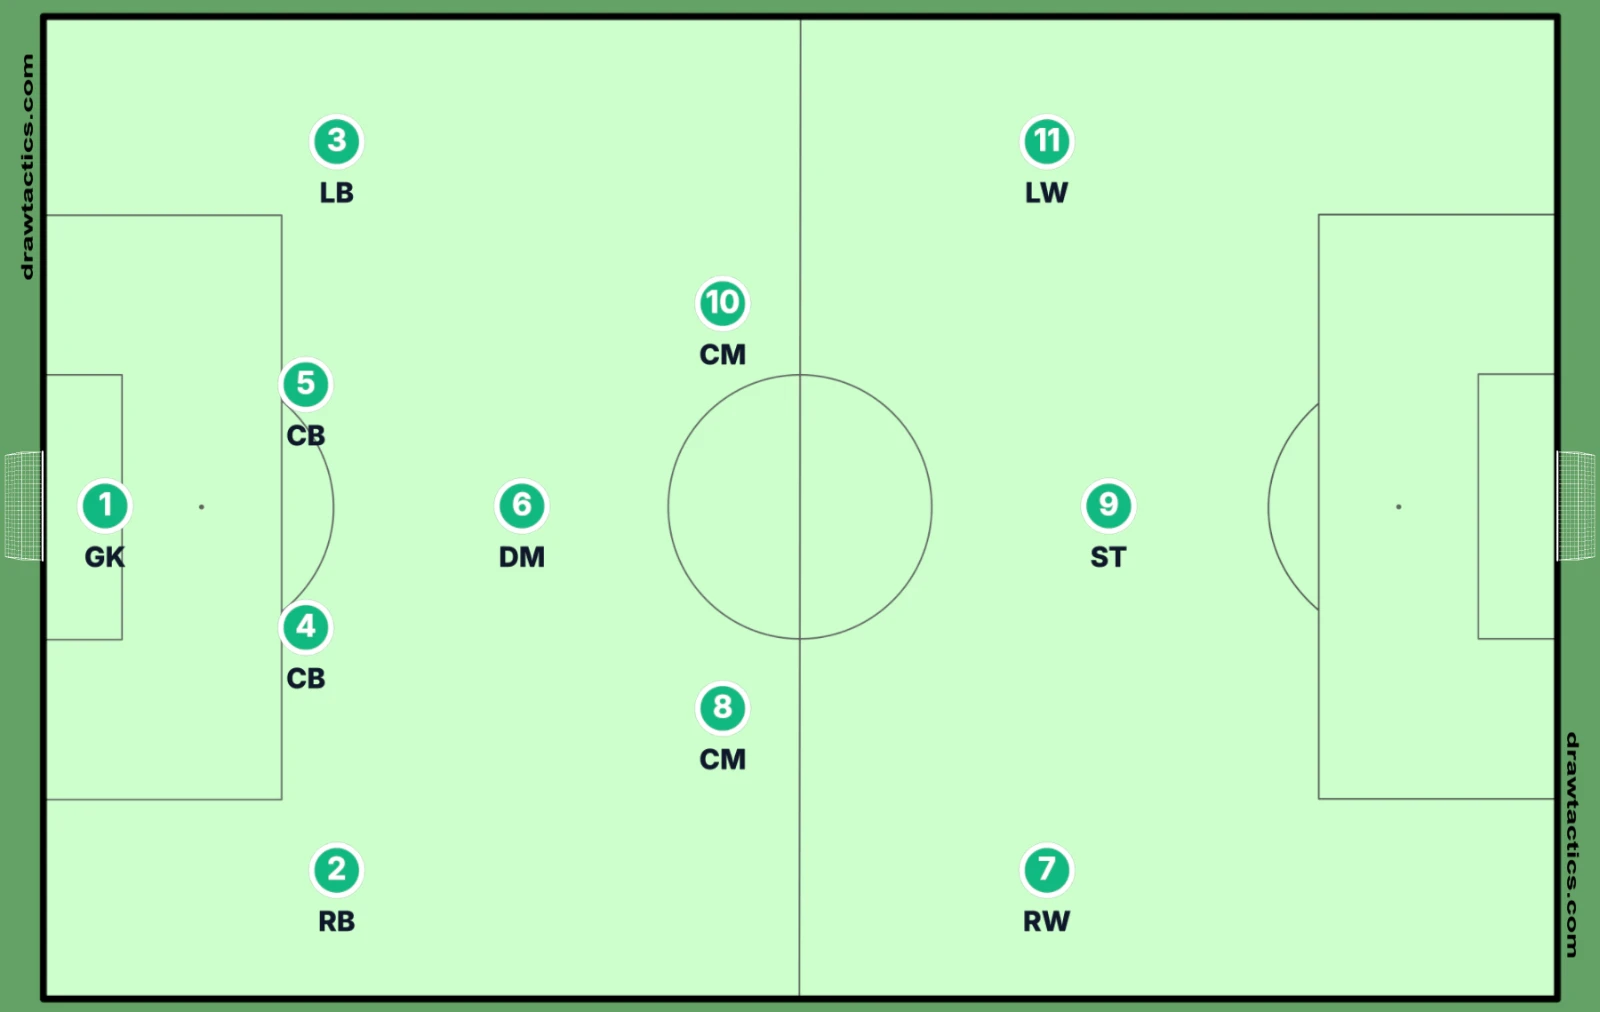
A midfield triangle of one defensive midfielder and two central midfielders, with two wingers and a striker up front. The 4-3-3 creates passing triangles all over the field, which is why it's the default shape for teams that want to keep the ball.
Strengths: easy to win the middle of the field, while the wingers stretch the opponent's back line. Three forwards also make high pressing straightforward.
Weaknesses: the space either side of the lone defensive midfielder is a target, and counters behind attacking full-backs are dangerous. Wingers and central midfielders need a big engine.
Best for: possession-based teams with quick wingers. Johan Cruyff's Barcelona, Pep Guardiola and Jürgen Klopp's Liverpool are the classic examples. See the full 4-3-3 tactical guide.
4-2-3-1
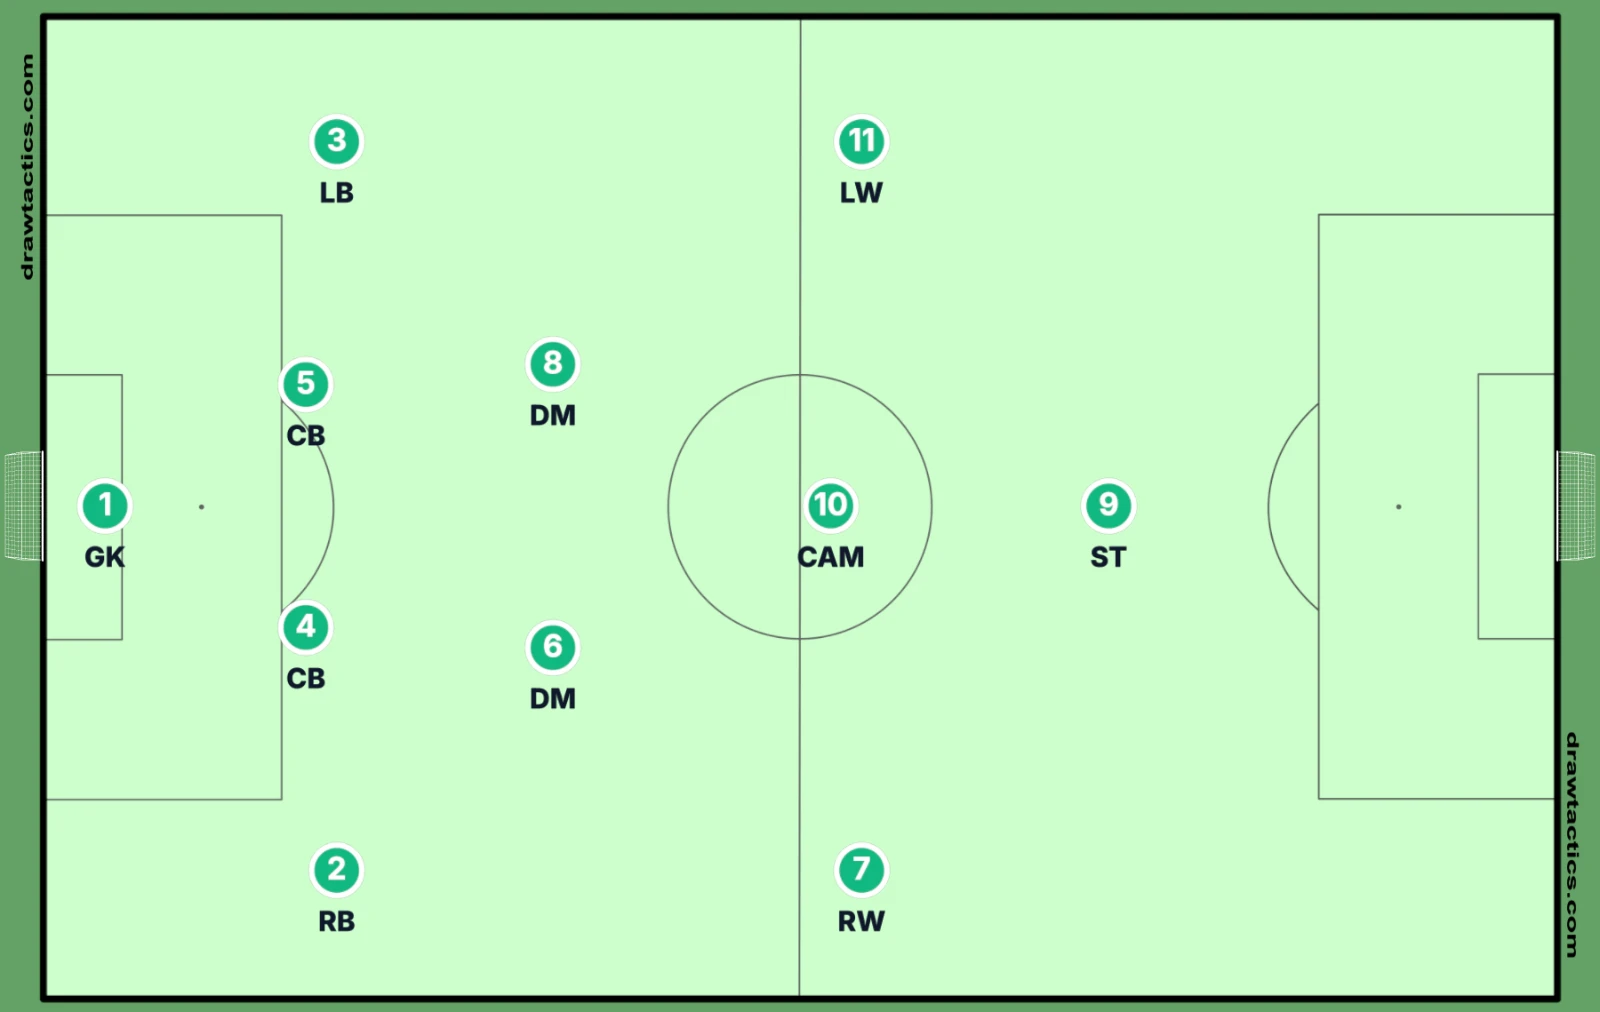
Two holding midfielders sit in front of the back four, with a No. 10 and two wide players ahead of them and one striker at the top. It has been one of the most common formations in soccer for twenty years; Spain and Germany both used it at the 2010 World Cup.
Strengths: the double pivot protects the defense, so the full-backs can attack. Without the ball the wide players drop back to make a compact 4-4-1-1 in seconds.
Weaknesses: the lone striker can get isolated, and if the gap between the No. 10 and the pivots grows, the midfield stretches. Wide players have a lot of running to do.
Best for: teams that want balance, and teams with a creative player who belongs behind the striker. Read the full 4-2-3-1 tactical guide.
3-5-2
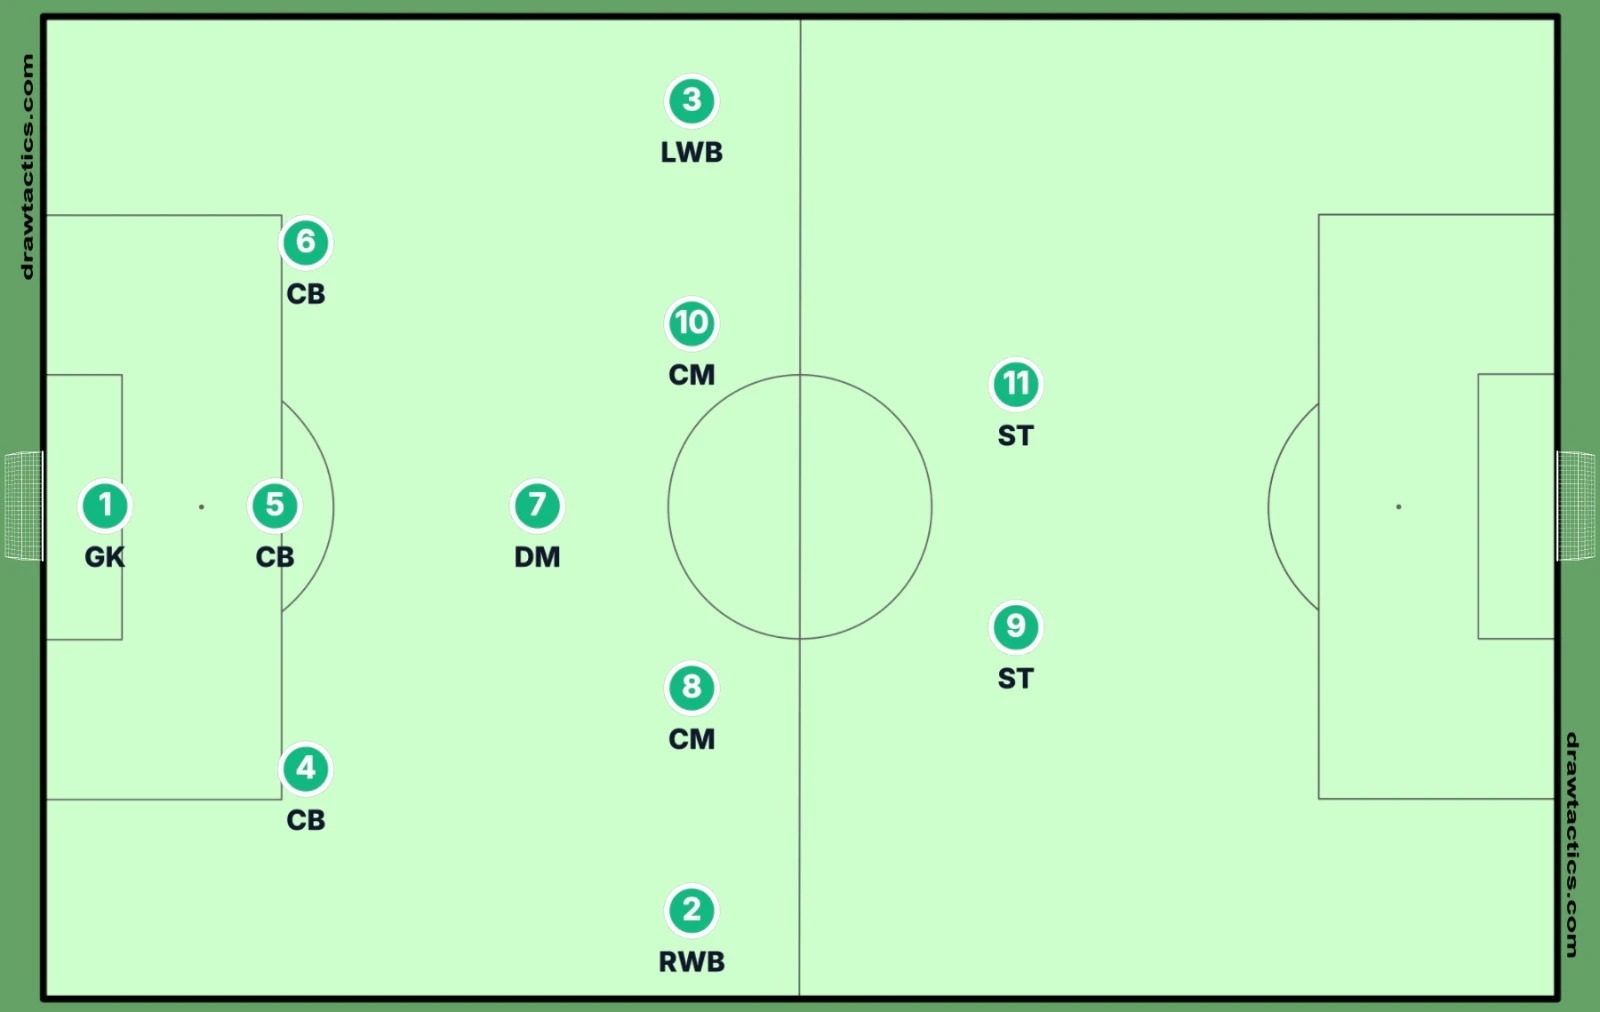
Three center-backs, a midfield five that includes two wing-backs, and two strikers. The middle of the field is crowded with your players, and the wing-backs push high in attack before dropping into a back five when you defend.
Strengths: a stable three-player build-up and numbers in central midfield, plus two strikers to occupy the box.
Weaknesses: each flank is covered by one wing-back, which is exhausting. The channels beside the outside center-backs can be exposed.
Best for: teams with three solid center-backs and wing-backs who can run all day. Antonio Conte's Juventus made the back three fashionable again. See the full 3-5-2 tactical guide.
3-4-3 (3-4-2-1)
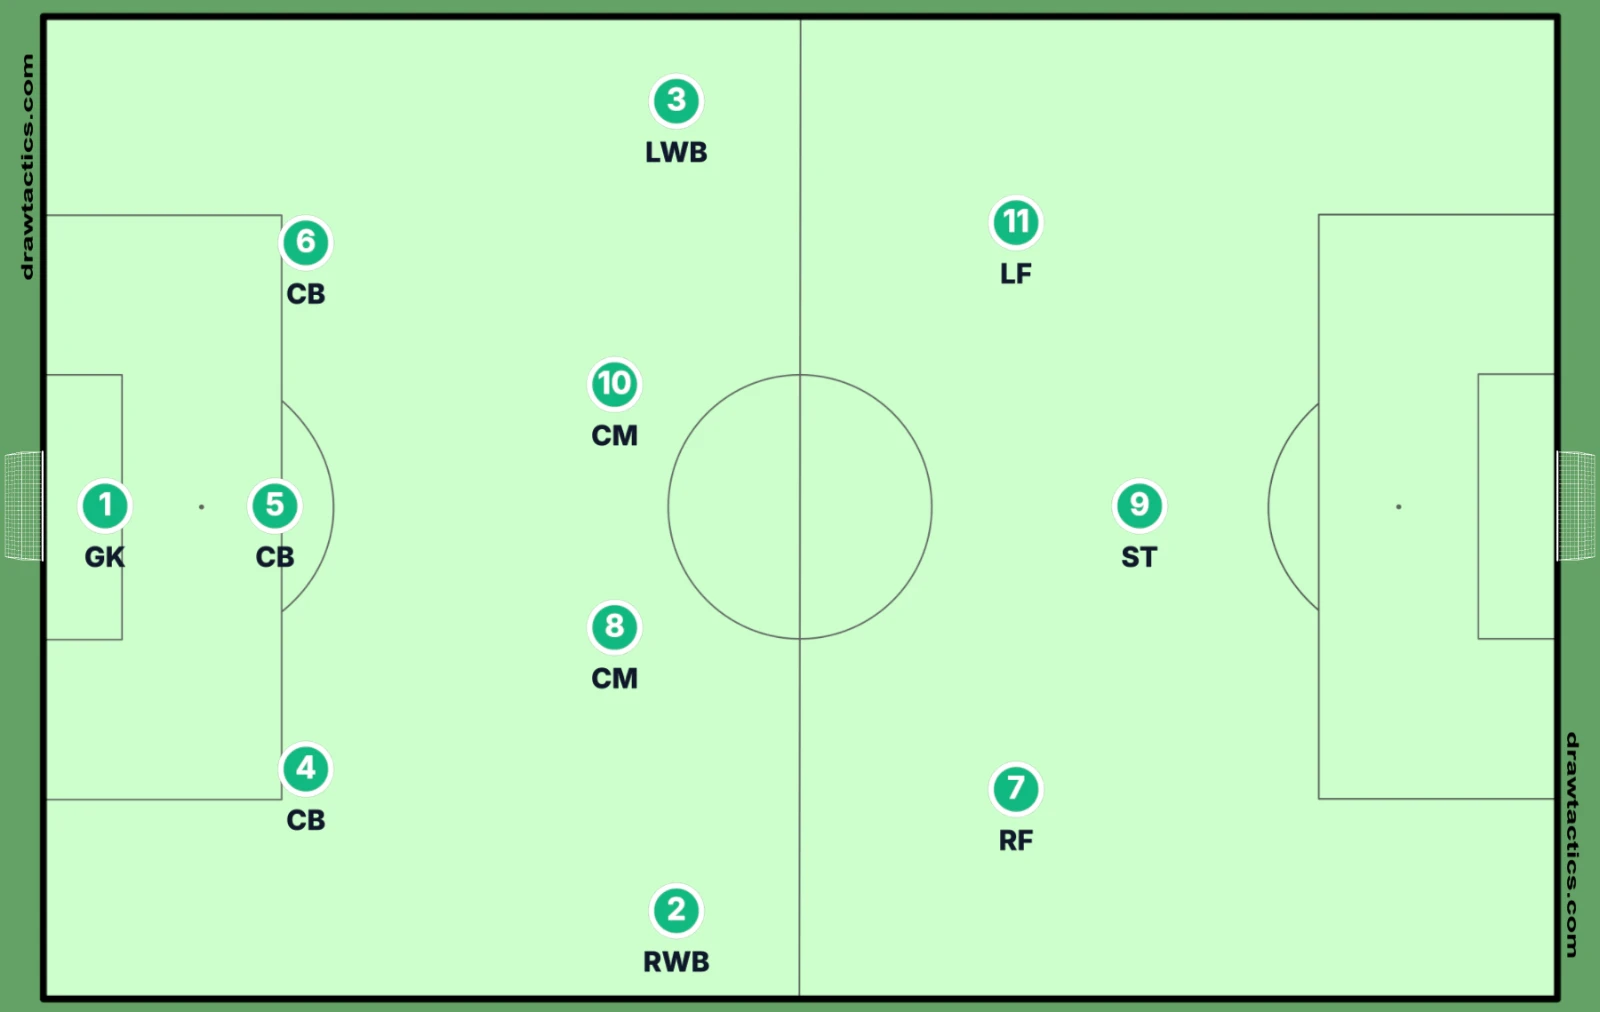
A back three, a midfield four made of two wing-backs and two central midfielders, and three forwards. When the two wide forwards tuck in behind the striker it is usually written as a 3-4-2-1.
Strengths: five players can attack together (the front three plus both wing-backs), which stretches a back four and outnumbers it. Pressing high is natural.
Weaknesses: only two central midfielders, so a midfield three can overrun you. With so many players committed forward, counter-attacks need a plan.
Best for: teams comfortable with a back three and with forwards who can win individual duels. Conte's Chelsea won the Premier League with a 3-4-3 in 2016-17.
4-1-4-1
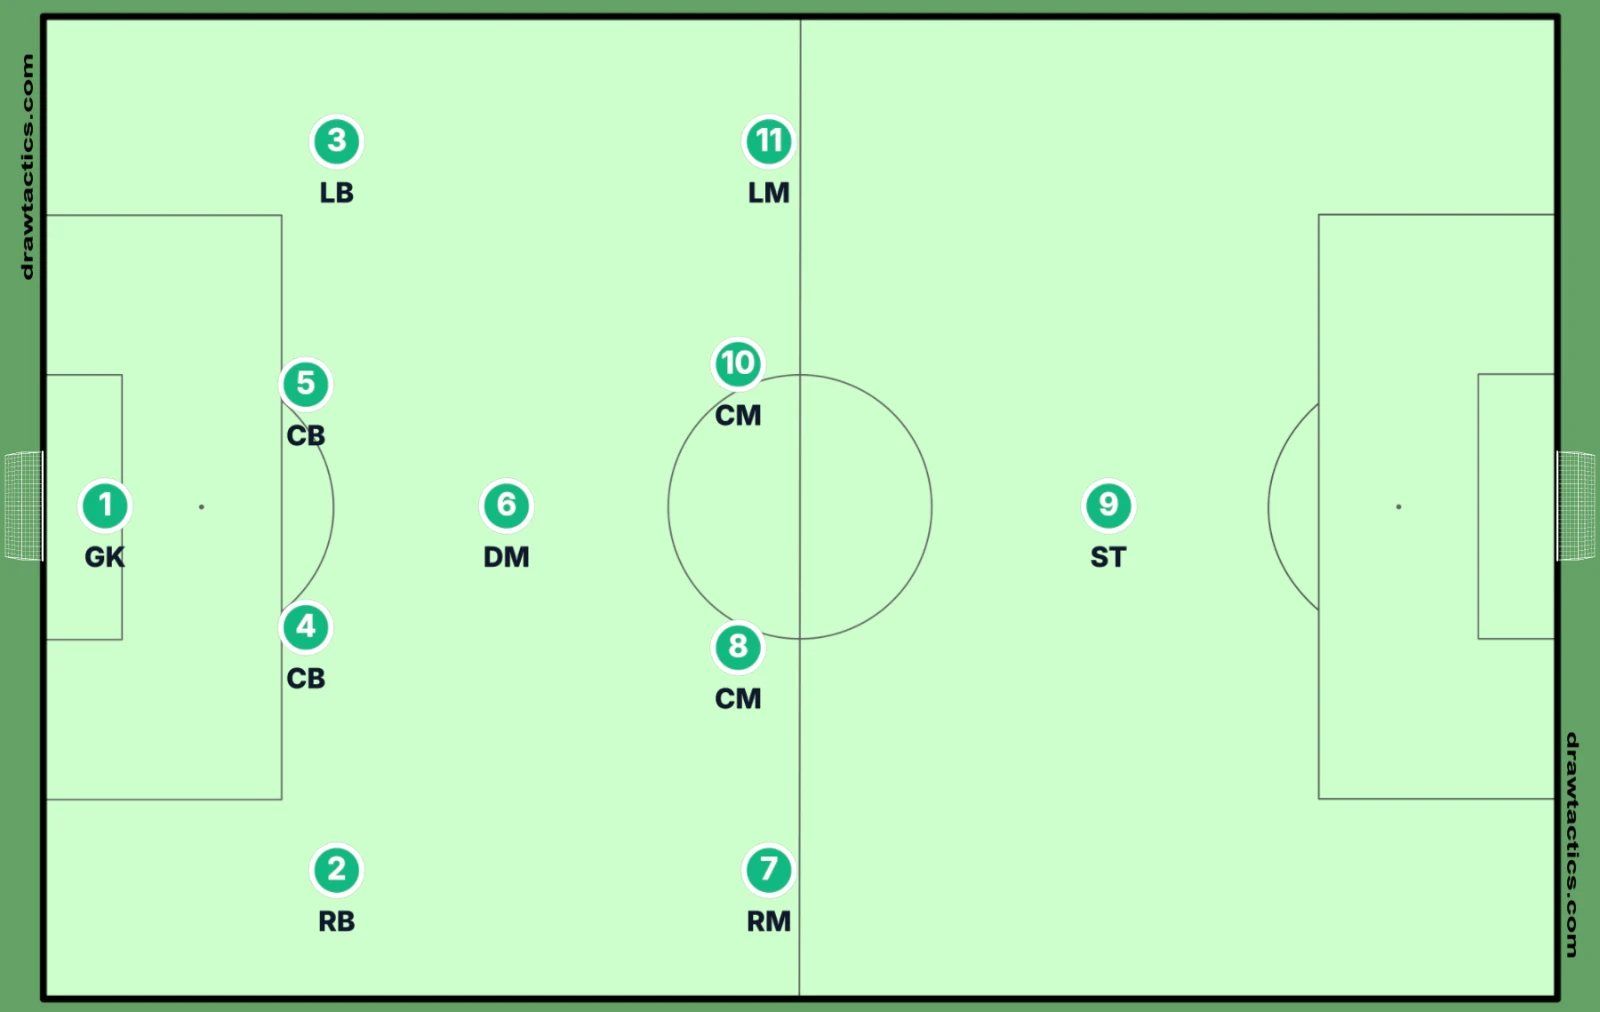
One defensive midfielder sits behind a line of four midfielders, with a single striker. It's easiest to think of it as a 4-3-3 whose wingers have dropped back to defend, and many teams use it as their shape without the ball.
Strengths: very solid through the middle, with five players screening the back four. It's one of the most reliable mid-block shapes.
Weaknesses: the striker can be left alone, and when you win the ball there may not be enough players forward. The defensive midfielder has a lot of ground to cover.
Best for: teams that want to defend in a mid-block against stronger opponents, or 4-3-3 teams that need more defensive security.
5-3-2 and 5-4-1
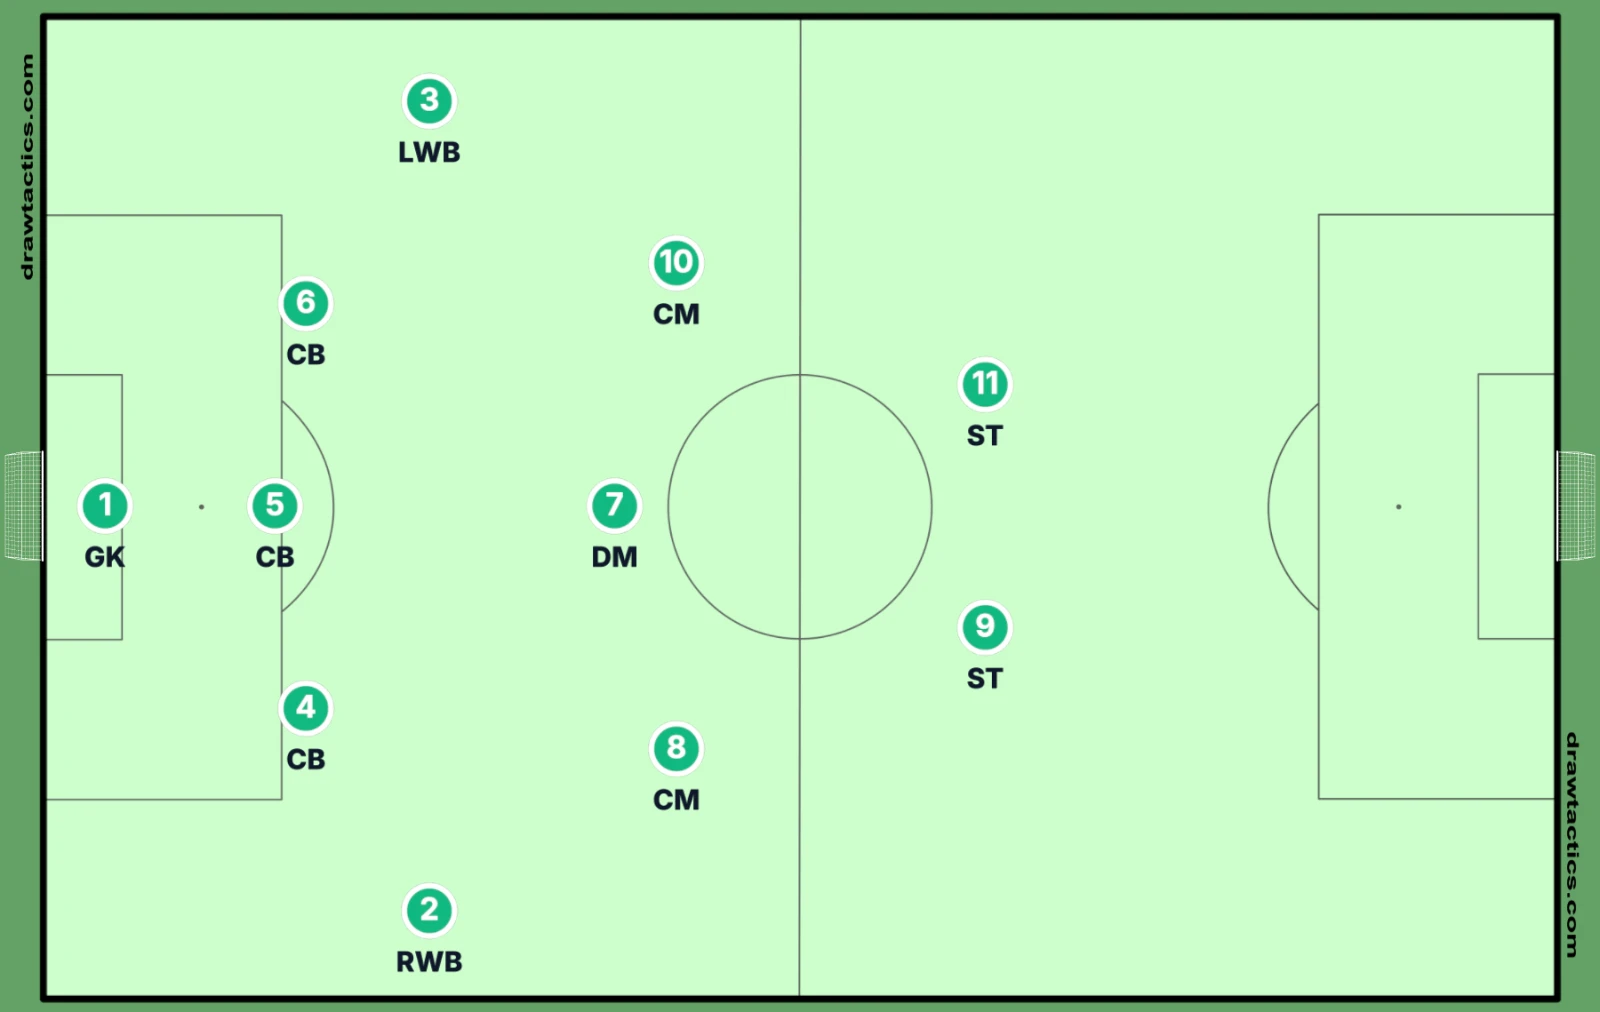
The wing-backs drop level with three center-backs to make a back five. With three midfielders and two strikers it's a 5-3-2; with four midfielders and one striker it's a 5-4-1. Teams that play a 3-5-2 or 3-4-3 often turn into one of these without the ball.
Strengths: the back line covers the full width of the field, so crosses and wide overloads are easier to deal with. Ideal when you need to protect a lead.
Weaknesses: the team can sit too deep and struggle to get up the field after winning the ball. In a 5-4-1 the striker is very isolated.
Best for: closing out games, facing stronger teams, and sides with fast forwards for the counter.
4-4-2 Diamond (4-1-2-1-2)
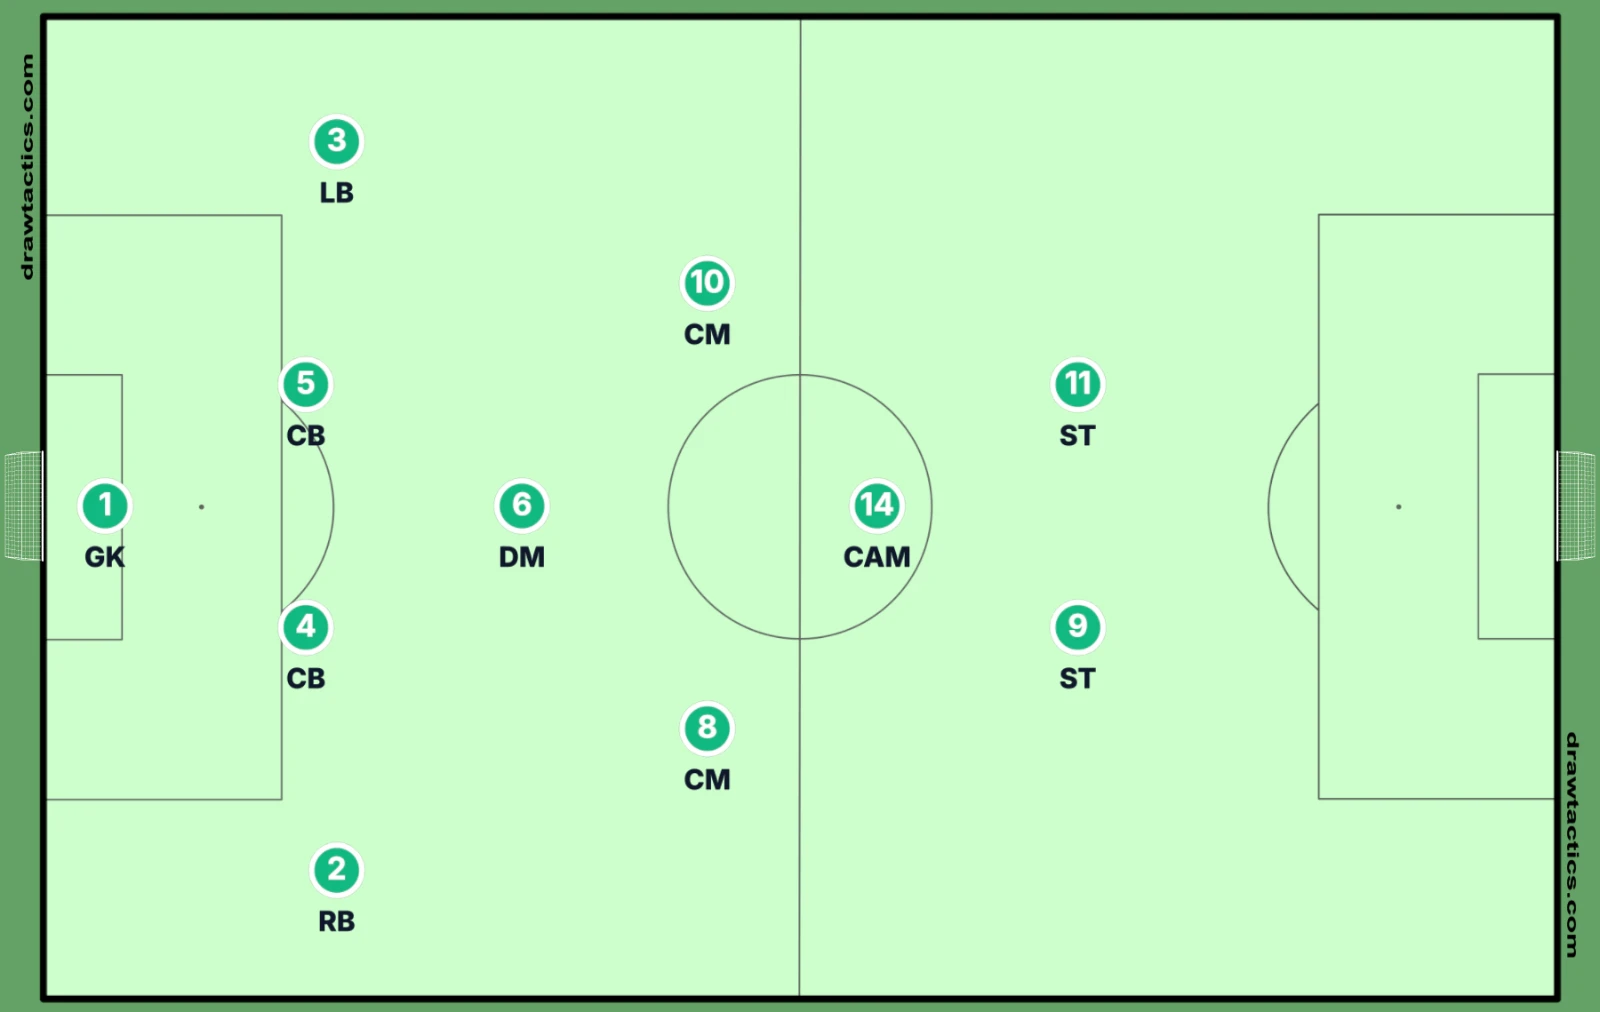
The midfield four is arranged as a diamond: a defensive midfielder at the base, two central midfielders, and a No. 10 at the tip behind two strikers. Carlo Ancelotti's AC Milan, with Andrea Pirlo at the base, is the best-known example.
Strengths: four players in central midfield give you control of the middle, and the No. 10 and two strikers can combine around the box.
Weaknesses: width comes almost entirely from the full-backs, which is demanding. When opponents attack down the flanks, the central midfielders have to shuttle across.
Best for: teams with technical central midfielders and full-backs who can get up and down.
Soccer Formations Compared
| Formation | Character | Main weakness | Key players | Difficulty |
|---|---|---|---|---|
| 4-4-2 | Balanced, two banks of four | Outnumbered in central midfield | Two hard-working CMs | Easy |
| 4-3-3 | Midfield triangle and width | Space beside the DM and behind the full-backs | DM, fast wingers | Medium |
| 4-2-3-1 | Double pivot and a No. 10 | Isolated striker | CAM, two DMs | Easy |
| 3-5-2 | Central numbers and two strikers | Channels beside the back three | Wing-backs, three CBs | Harder |
| 3-4-3 | Five attackers | Only two central midfielders | Wide forwards, wing-backs | Hard |
| 4-1-4-1 | Compact mid-block | Few players forward | A mobile DM | Medium |
| 5-3-2 / 5-4-1 | Defend the box | Getting up the field | Wing-backs, quick strikers | Medium |
| 4-4-2 diamond | Control of the middle | Lack of width | CAM, attacking full-backs | Harder |
Want to try a few of these with your own players' names? The free soccer lineup builder lets you pick a formation, type in your roster and download the lineup as an image in under a minute.
How to Choose a Soccer Formation
1. Start with your players
Choose the formation that fits the players you have, not the one you admire most. Forcing players into a shape that doesn't suit them always shows up somewhere.
- Wide players who love to dribble? A 4-3-3 or 4-2-3-1 gives them one-on-one chances.
- A creative playmaker? Give them the No. 10 role in a 4-2-3-1 or at the tip of a diamond.
- Players who can run up and down all game? They'll shine as wing-backs in a 3-5-2 or 3-4-3.
- Two strikers with different strengths? Pair them in a 4-4-2 or 3-5-2.
2. Think about level and training time
If you only train once or twice a week, start with a shape that has few rules to learn, like the 4-4-2 or 4-2-3-1. Back threes and diamonds need more coordinated sliding and covering, and take longer to bed in.
3. Look at the opponent
How your shape matches up against theirs matters too. A 4-4-2 against a three-player midfield will often be outnumbered in the middle, so you might drop a striker onto their holding midfielder or ask your wide midfielders to tuck in.
What Is the Best Soccer Formation?
There isn't one. Every formation has strengths and weaknesses, and whether an opponent can exploit those weaknesses depends on the quality of the players and how well they've been prepared.
At the top level, teams win trophies with a 4-3-3, a 4-2-3-1, a 3-4-2-1 and plenty of other shapes. The better question isn't which formation is strongest, but which one gets the most out of your players and how you'll cover its weak spots.
Formations Change With and Without the Ball
In modern soccer the starting formation is only the starting point. Most teams play one shape when they have the ball and another when they don't.
- In possession: a common pattern is the full-backs pushing high and one midfielder dropping into the back line, which turns a back four into a 3-2-5.
- Out of possession: a 4-3-3 usually becomes a 4-1-4-1 or 4-5-1, a 4-2-3-1 becomes a 4-4-1-1, and a 3-5-2 becomes a 5-3-2.
When you explain a formation to players, show both shapes and the movement between them. That's what they'll actually see on game day.
Formations for Small-Sided Soccer
Youth and recreational soccer is often played with fewer players, which changes which formations make sense. Each of these pages covers the common shapes for that format and includes a free lineup maker:
- 5v5 soccer formations (1-2-1, 2-2 and more)
- 7v7 soccer formations (2-3-1, 3-2-1 and more)
- 8v8 soccer formations (3-3-1, 2-3-2 and more)
- 9v9 soccer formations (3-2-3, 3-3-2 and more)
In the UK? The same guides are available as 5-a-side, 7-a-side and 9-a-side football formations, with a free team sheet maker.
Drawing Formations With DrawTactics
Players understand a formation much faster when they can see it. The DrawTactics tactics board runs in the browser on a computer or tablet: place your players, add arrows and zones, and animate how the shape changes between attacking and defending. Every formation diagram on this page was made on the board.
For a step-by-step walkthrough, see how to create soccer formations online. To build custom shapes, map player roles and export them as training visuals, try the soccer formation builder.
Build Your Team's Formation
Set up your players, compare shapes, and share clear diagrams of how your team attacks and defends.
Start with DrawTacticsConclusion
There are many soccer formations, from the 4-4-2, 4-3-3 and 4-2-3-1 to back-three systems like the 3-5-2 and 3-4-3. Each has strengths and weaknesses, and the right one depends on your players, your training time and the team you're facing.
Pick one shape, teach its principles until they're second nature, then use the full tactical guides to adjust it to your team.
FAQ
What is the most common soccer formation?
In professional soccer today the 4-3-3 and 4-2-3-1 are the most common. In practice, though, most teams change shape between attacking and defending, and plenty use a back three or a 4-4-2.
What is the best soccer formation for youth or beginner teams?
For 11v11, the 4-4-2 and 4-2-3-1 are the easiest to teach because every player has a clear job and a clear partner. For small-sided youth games, start with simple shapes such as a 2-3-1 in 7v7 or a 3-3-1 in 8v8.
What is the difference between a 4-4-2 and a 4-3-3?
A 4-4-2 has a flat midfield four and two strikers; a 4-3-3 has a midfield triangle of three and three forwards. The 4-4-2 is simpler to organize defensively, while the 4-3-3 makes it easier to win the middle of the field and stretch the opponent with wingers.
Can you change formation during a game?
Yes, and most teams do. Switching to a back five to protect a lead, or adding a third forward when chasing a goal, is completely normal. Rehearse the switch in training so players know exactly where to go.