Youth players often hear “press” and interpret it as “everybody run toward the ball.” That creates energy, but not an effective press. One player arrives too fast, two teammates follow, and a single pass removes all three.
The solution is to teach pressing as a small set of connected decisions. The nearest player applies pressure. The next defender provides cover. The rest of the team protects useful passing options and stays compact. If the opponent escapes, everyone recovers together.
To teach pressing to youth players, start with the nearest defender closing the ball under control. Add a second player for cover, then introduce one obvious trigger such as a heavy touch or backwards pass. Progress from 1v1 to 2v2, a small-sided transition game, and finally a conditioned match. Reward coordinated regains, not uncontrolled chasing.
See the trigger. Close the space. Move together.
- Pressure, cover, and balance
- One clear trigger at a time
- From 1v1 habits to a 6v6 game
What Pressing Means for Youth Players
Pressing is a coordinated attempt to limit the player in possession and make the next pass predictable. Winning the ball is the ideal outcome, but it is not the only successful one. A press can also force play backwards, send the ball toward the touchline, produce a rushed clearance, or give teammates time to recover.
This distinction matters with young players. If they believe success only means making a tackle, the first defender will dive in. If they understand that their job is to remove time and guide the opponent, they can stay balanced and help the rest of the team.
Use player-friendly language: “Arrive fast, slow down, show one way” is easier to apply than a long explanation about pressing angles and cover shadows.
The Five Pressing Principles to Teach First
Remove hesitation by giving the closest defender clear responsibility for the ball.
Close quickly while the ball travels, then shorten the steps so the attacker cannot beat the press with one touch.
Use a curved approach to protect the dangerous inside pass and guide play toward a teammate or the touchline.
Support behind and slightly inside the first defender, ready for a pass, dribble, or missed challenge.
The press is collective. Teammates move closer, protect the next options, and prepare to react if the first pressure is beaten.
Pressure without cover is a gamble. Cover without pressure gives the opponent time. Compactness without either allows easy possession. Teach the three ideas together, but add detail gradually.
A Step-by-Step Progression for Teaching Pressing
- Walk through the approach. Start without opposition. Roll or pass the ball to a receiver and let the defender practise closing while the ball moves, slowing on arrival, and curving the run to show one direction.
- Add a 1v1 channel. Give the attacker a line or mini-goal to reach. The defender scores by forcing play out, delaying for a set time, or winning possession. This teaches that defending has more than one successful outcome.
- Introduce pressure and cover in 2v2. The first defender engages the ball. The second defender adjusts behind and inside. Pause briefly to ask, “If your teammate is beaten, can you reach the ball?”
- Use a transition game. Play 3v3 or 4v4 in a compact area. Award a bonus point for regaining shortly after losing possession, but require the team to recover into shape when the immediate press is not secure.
- Add one pressing trigger. Begin with a heavy touch because it is visible. Freeze the game when it appears, name it, and restart. Remove the coach call once players begin recognising it themselves.
- Transfer the idea into 6v6 or the team's match format. Keep the game directional and include realistic targets. Observe whether the nearest player presses, teammates cover, and the far side becomes compact.
The sequence matters. Players should first learn how to approach the ball, then how to support the presser, and only then how to move as a larger unit. Going straight to team shape often produces players who know where the coach wants them to stand but not how to defend the moment in front of them.
Adapt the detail to the players, not only the age label
For less experienced groups, focus on the nearest player, a controlled approach, and recovering goal-side. More experienced youth teams can work on shared triggers, curving the press, protecting central space, and the movement of the far-side players. A confident U11 group may be ready for detail that a new U14 group has not yet learned.
Pressing Triggers Youth Players Can Recognise
A trigger is a moment when the opponent becomes easier to pressure. Teach one trigger until the team reacts consistently, then add another.
| Trigger | Why It Helps the Press | Simple Team Cue |
|---|---|---|
| Heavy touch | The receiver temporarily loses close control. | “Touch gets away—go.” |
| Slow or bouncing pass | The press can travel while the ball travels. | “Move on the pass.” |
| Backwards pass | The receiver often faces their own goal and has fewer forward options. | “Step together.” |
| Receiver facing backwards | The player cannot immediately see or play forward. | “Lock them in.” |
| Pass toward the touchline | The line removes space on one side and helps predict the next action. | “Keep them outside.” |
| Isolated receiver | Support is too far away to offer an easy escape pass. | “No help—press.” |
Do not ask young players to memorise the full list in one session. Choose the trigger that appears most often in your game format. A heavy touch works well as a first trigger because players can see it without needing a complex understanding of team shape.
Animated 6v6 Pressing Practice
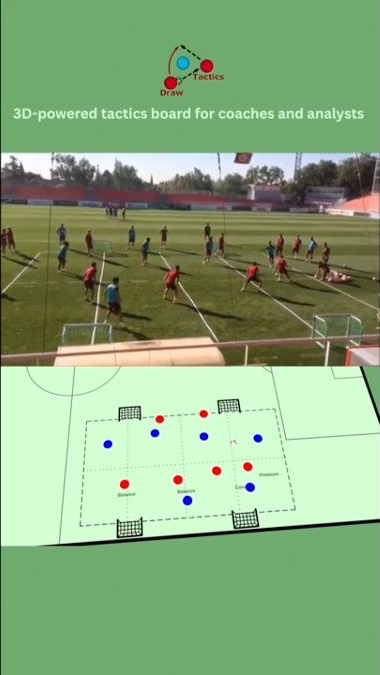
The following animation combines live training footage with the same 6v6 practice on a tactical board. Showing both views helps players connect the clean diagram with the distances, speed, and decisions they will experience on the pitch.
What players should look for
- Who becomes the first defender when the ball changes hands?
- Where is the covering player if the first press is beaten?
- How do the remaining defenders provide balance and protect the far side?
- Does the team move while the pass travels or after the receiver controls it?
- When should the group stop pressing and recover?
Play the clip once without stopping. On the second viewing, pause at the moment pressure, cover, and balance become visible.
Suggested setup
- Two teams of six in a directional rectangular area.
- Two mini-goals at each end so both teams can attack immediately after regaining.
- An area large enough for possession but compact enough for the second defender to provide realistic cover.
- Several balls with the coach to keep the practice flowing.
To prepare the setup for staff or players, use the guide to creating football training drill diagrams. It explains how to show the area, equipment, starting ball, rules, and progressions without overcrowding the picture.
How to score
A normal goal rewards the attacking outcome. Add a bonus point when a team regains through a clear trigger and scores quickly. Avoid rewarding any turnover if the players simply swarm the ball; the behaviour should still show pressure, cover, and team balance.
Useful progressions
- Begin with free play and observe the team's natural reaction.
- Introduce one named trigger, such as a backwards pass.
- Require the pressing team to force play toward one side before it can score a bonus point.
- Increase the area if players cannot keep possession long enough for pressing decisions to appear.
- Reduce the area or add a short possession target if the press never arrives.
- Finish by removing bonus rules and see whether the behaviour survives in a normal game.
The FIFA Training Centre also uses a 6v6 small-sided game to coach compact high pressing against build-up. The important principle is transfer: the practice should contain opponents, direction, transition, and realistic decisions.
Example 70-Minute Youth Pressing Session
- 10 minutes
- Arrival game: 3v3 or 4v4. Bonus point for a regain shortly after losing the ball. Observe before coaching.
- 10 minutes
- 1v1 approach: Close while the ball travels, slow down, and show one side.
- 12 minutes
- 2v2 pressure and cover: First defender engages; second defender protects inside and depth.
- 20 minutes
- 6v6 directional pressing game: Use one trigger and the four mini-goal setup shown above.
- 15 minutes
- Conditioned match: Play in the team's normal format. Remove most restrictions and check for transfer.
- 3 minutes
- Review: Ask players to name the trigger, the first defender's job, and the recovery response.
Use short work periods inside the intense games and adjust the recovery to the group. The aim is repeatable decision-making, not running players until their technique and judgement disappear.
To turn this into a printable plan, put each block into the free football session planner: draw the practice, add the coaching points and progressions, then download it as a PDF for the pitch.
Common Mistakes When Coaching Youth Pressing
Shouting “press” without defining who goes
If every player hears the same command, several may attack the ball. Use “nearest player presses” and coach the others to cover and balance.
Teaching too many triggers at once
Players begin reacting to the coach's voice rather than the game. Name one trigger, repeat it across several practices, then remove the prompt.
Making the area too small
A tiny pitch can make pressing look successful because the player in possession has no realistic space. If every turnover comes from congestion rather than a recognised cue, enlarge the area.
Only coaching the first defender
The first defender is visually obvious, so coaches often ignore the supporting movement. Freeze occasionally with the ball covered and ask the second defender to show their cover position.
Never teaching the exit
A press can be beaten. Players need a shared response: delay the next attack, recover toward goal, become compact, and wait for another secure trigger. Continuing to chase creates larger spaces.
Using fitness as the main measure
Pressing is physically demanding, but effort alone does not prove understanding. Assess whether players recognise the trigger, arrive under control, protect each other, and recover when necessary.
How Animation Helps Before the Session
An animation lets the coach show the order of the actions before the practice starts. Keep it short: identify the trigger, highlight the first presser, show the cover position, and reveal the final compact shape. Then move quickly onto the pitch so players can solve the problem against live opponents.
For a reusable way to present the same idea in meetings and on the training pitch, see the guide to explaining football tactics to players. It covers team objectives, unit relationships, player cues, guided questions, and choosing between diagrams, animation, and match video.
You can build a starting setup with the online tactics board and turn it into a step-by-step sequence using the animated tactics board. The guide to creating football coaching animations explains the complete workflow, including step-specific notes and MP4 export.
Build Your Pressing Session Visually
Create the practice layout, animate the trigger and supporting movements, then share the sequence with players before training.
Frequently Asked Questions
What is the best age to teach pressing in football?
Players can learn simple pressing habits from the early small-sided years, but the detail should match their experience. Start with the nearest player applying pressure and teammates getting goal-side. Introduce shared triggers and unit pressing as their awareness develops.
What are the main pressing triggers for youth players?
Useful triggers include a heavy touch, a slow or bouncing pass, a backwards pass, a receiver facing their own goal, and a pass toward the touchline. Teach one trigger at a time before combining them.
How do you stop youth players chasing the ball when pressing?
Give the nearest player responsibility for pressure while the next defender provides cover and the remaining players protect useful passing options. Reward compact team regains rather than the number of players surrounding the ball.
How long should a youth pressing drill last?
Use short, intense blocks with enough recovery to preserve decision quality. The exact duration depends on age, numbers, area, weather, and training load. Stop or enlarge the area if pressing becomes uncontrolled chasing.
Should youth teams press high all the time?
No. Players also need to recognise when the press is no longer secure and recover into a compact shape. Teaching when not to press is part of teaching pressing well.
Final Coaching Checklist
- Can players identify who applies the first pressure?
- Does the first defender arrive under control and show one direction?
- Is there cover behind and inside the press?
- Do the remaining players become compact while the ball travels?
- Can the team name the trigger without help from the coach?
- Does everyone recover when the press is beaten?
Pressing becomes teachable when it stops being a demand for more running and becomes a shared problem players can recognise. Start with one defender, add one relationship, introduce one trigger, and then place the decisions inside a game. Clarity first; intensity follows.