Static diagrams show where players stand. A football animation shows what happens next: who moves first, where the ball travels, how the team reacts, and when each phase changes. That makes animation particularly useful for coaching pressing triggers, build-up patterns, set pieces, training drills, and position-specific movement.
You do not need video-editing software to build one. DrawTactics turns a tactical board into a sequence by letting you set the players and ball in each step. The Animation Studio creates the movement between those positions, while you control the speed, pauses, annotations, camera view, and final video export.
How to Make a Football Animation for Coaching
Choose one coaching objective, arrange the players and ball on a 2D or 3D tactics board, add a new animation step, move each object into its next position, and repeat for every phase. Add coaching notes where needed, preview the sequence, then export it as an MP4 or WebM video.
Table of Contents
Why Use Animation in Football Coaching?
A still formation is useful for explaining structure, but it leaves the timing open to interpretation. An arrow can show that a full-back overlaps, for example, but it cannot show whether the run begins before or after the winger receives. Animation makes that relationship visible.
It also gives every player the same version of the explanation. You can play the sequence during a team meeting, send it before training, or revisit it on the pitch. Instead of redrawing the same pattern, the coach can pause the clip at the relevant phase and discuss one decision at a time.
The goal is not to reproduce a match perfectly. A useful coaching animation isolates the action players must recognise: the trigger, the movement, the supporting positions, and the intended outcome.
The Six-Step Coaching Workflow
- Choose one coaching objective. Decide whether the animation is teaching a pressing trigger, build-up route, combination, drill rotation, or set-piece routine. One clip should answer one clear question.
- Build the starting picture. Use the 3D-powered online tactics board to add the pitch, players, ball, names, numbers, and any training equipment. Use 2D for a clean overhead diagram or 3D when perspective helps the presentation.
- Add the first movement step. Open Animation Studio and select Add step. Move the players and ball to the positions they should reach in the next phase. The studio creates the movement between the starting picture and the new positions.
- Build the remaining phases. Add another step for each meaningful change. Keep the sequence short: receive, react, support, and finish is usually clearer than trying to show an entire possession.
- Add cues and set the pace. Use arrows, shapes, connections, and text to direct attention. Set the movement speed and add a hold after each step when players need time to read a note or inspect the final shape.
- Preview, crop, and export. Play the animation from the beginning, correct unclear movements, then export the relevant area as MP4 or WebM for your meeting, messaging group, or analysis presentation.
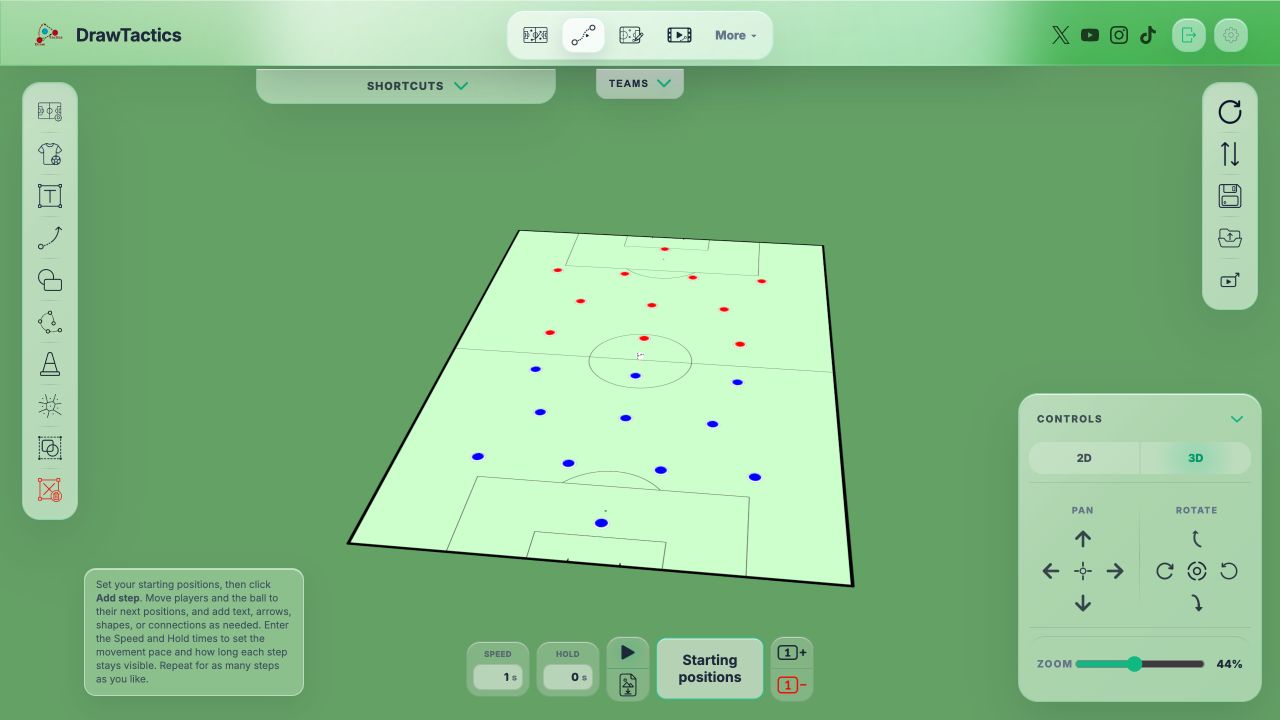
Think of each step as a coaching picture. When the pictures are placed in the correct order, Animation Studio supplies the motion between them. This keeps the workflow closer to planning on a tactics board than editing a traditional video timeline.
Worked Example: Explaining an Overload
The example below shows how an animation can combine player movement, a highlighted tactical zone, and directional cues. It gives the viewer a clear area to watch before the sequence develops.
1. Define the starting picture
Position the ball carrier, the nearest supporting players, and the defenders who affect the decision. Remove players who do not contribute to the coaching point unless the team shape itself is important.
2. Mark the space you want players to recognise
Add a translucent shape over the target zone. This might be the space behind a midfielder, the channel between full-back and centre-back, or the area the team wants to overload. A single zone is easier to read than several competing highlights.
3. Separate the actions into steps
- Starting positions: establish the ball, the spare player, and the defending shape.
- Step 2: move the first player to draw or fix the defender.
- Step 3: move the supporting player into the space that has opened.
- Step 4: show the pass or carry that completes the action.
Coaching cue: write the decision players must recognise, not a description of what they can already see. “Move when the defender jumps” is more useful than “player runs forward.”
Adding Coaching Notes and Visual Cues
DrawTactics supports text boxes, arrows, shapes, and player connections inside the animation. Each annotation can appear on the current step or remain visible across all steps. The Draw on option can reveal an annotation during playback, which helps direct attention without covering the board from the beginning.
- Text: state the trigger, decision, or role in a few words.
- Arrows and lines: show a run, pass, pressing angle, or blocked lane.
- Shapes: highlight an overload, target zone, compact block, or space to protect.
- Connections: show the distances and relationships between units.
- Training assets: add cones, goals, and mannequins when demonstrating a practice rather than a match situation.
Use This step when an instruction only applies to one phase. Use All steps for a permanent reference such as a target zone or the width of the practice area.
How to Make the Animation Easy to Understand
Start with the trigger
Tell the viewer what starts the action. It could be a backwards pass, a poor first touch, a centre-back carrying forward, or the opposition winger pressing inside. Without the trigger, players may copy the movement at the wrong moment.
Keep each clip focused
Three or four steps are often enough for one coaching message. If the clip needs several paragraphs of explanation, split it into separate animations for the first action, the reaction, and the end position.
Use holds deliberately
Movement should be quick enough to feel connected, but important end positions need time to register. Add a short hold when a new shape forms or a coaching note appears. This is especially useful in set pieces and rotations with several simultaneous movements.
Make the ball easy to follow
Player movement attracts attention, so the ball can disappear visually in a crowded sequence. Use fewer annotations around the ball and consider pausing briefly at the moment the next player receives.
Check the animation without narration
Play the finished sequence with the sound off and no extra explanation. If the trigger, movement, and outcome are still clear, the animation is ready to share. If not, simplify the board or add one short coaching note.
Exporting and Sharing the Video
Animation Studio exports both MP4 and WebM. The export panel also lets you crop the pitch, choose 720p or 1080p resolution, and select 30 or 60 frames per second. MP4 is the most convenient choice for messaging apps, team presentations, and general video editing. WebM is useful for browser playback and smaller web-ready files.
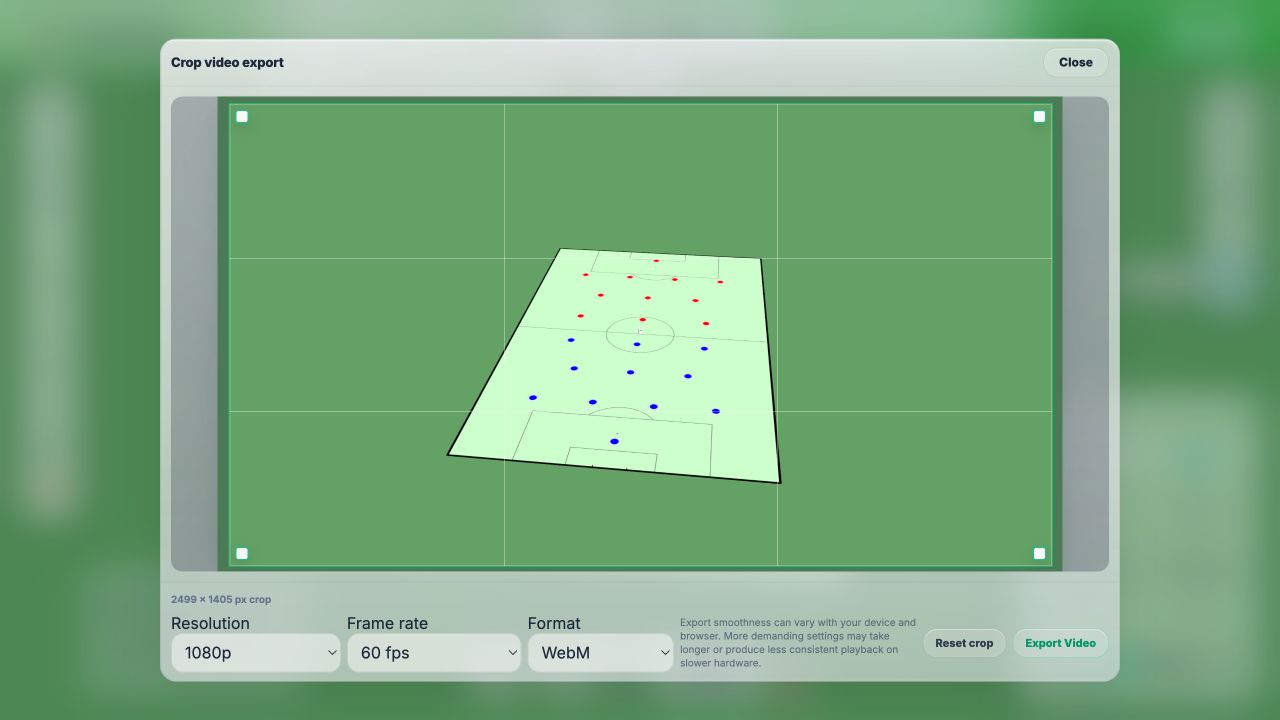
- Team meeting: use a landscape MP4 and leave enough pitch visible to preserve the team shape.
- Player messaging group: crop tightly around the action so the movement remains readable on a phone.
- Training session: save the project as well as the video so you can adjust positions after trying the practice.
- Social media: keep the opening frame immediately understandable and crop to the platform's available space.
Football Animation Ideas for Coaches
Once you have built one sequence, the same workflow can be reused across different coaching tasks:
- Pressing triggers: show who initiates the press and how the players behind lock the next options.
- Build-up patterns: demonstrate how the goalkeeper, centre-backs, pivot, and full-backs create the spare player.
- Third-player combinations: make the relationship between the first pass, set, and forward run visible.
- Set pieces: separate screens, decoy runs, delivery, and finishing positions into short phases.
- Training drills: explain rotations before players enter the practice area.
- Opposition preparation: animate the pattern your team should expect and the response you want.
For practical coaching examples, the guide to creating football training drill diagrams covers exercise setup, notation, rules, and progressions. The guide to explaining tactics to players shows how to present those visuals, while the guide to teaching pressing to youth players applies the method through a 6v6 animation.
If you are still deciding how to organise the starting shape, read the guide to creating football formations online. For system-specific examples, explore the 4-3-3 tactical guide and the guide to positional play.
Frequently Asked Questions
What is the easiest way to make a football coaching animation?
Start with player and ball positions on a tactics board, add a new step, move the objects to their next positions, and repeat. A step-based tool creates the movement between those positions automatically, so you do not need to draw video keyframes.
Can I animate football drills as well as match tactics?
Yes. Add cones, goals, mannequins, zones, players, and the ball to create the drill layout. Then animate the rotations, passes, and player movements one step at a time.
Can I create football animations in 3D?
Yes. DrawTactics supports both 2D and 3D views. Use 2D for a familiar overhead tactical diagram or 3D when a perspective view makes the coaching presentation easier to understand.
Can several players and the ball move at the same time?
Yes. Move every relevant player and the ball to their next positions within the same step. They will travel together when that phase plays.
Can coaching notes appear on only one animation step?
Yes. Text, arrows, shapes, and connections can be assigned to the current step or shown throughout the animation. They can also draw on during playback.
Can I export a football animation as MP4?
Yes. DrawTactics exports MP4 and WebM video, with crop, resolution, and frame-rate controls.
Create Your First Football Coaching Animation
Start on the 3D-powered tactics board, turn the idea into a step-by-step sequence, and export a video you can share with players.
Explore Animation Studio →From Coaching Idea to Shareable Animation
A useful football animation does not need dozens of movements or advanced editing. Start with one coaching objective, show the trigger, separate the action into clear steps, and give players time to recognise the final picture. The result is a repeatable visual explanation you can use before training, during analysis, or in a team meeting.
Build the starting picture with the online tactics board, then use the animated tactics board to add movement and export the finished coaching video.